7 Essential Steps to Change RV Generator Oil and Avoid Costly Breakdowns
When it comes to changing your RV generator oil, consistency is key. Most manufacturers recommend changing the oil every 50 to 100 hours of operation, depending on the generator type.
Here’s a general rule of thumb:
- If you use your RV frequently, change the oil at least once a year.
- For occasional users, change it every 50 hours of use or whenever the oil looks dirty.
Not sure how many hours you’ve logged? Many generators come with an hour meter to help you keep track. And if yours doesn’t, consider keeping a simple log to track your usage manually.
Step-by-Step Guide to Changing RV Generator Oil

Step 1: Preparation
Before diving into the work, take these essential steps to ensure a smooth process:
- Park your RV on a flat surface to prevent spills and ensure accurate oil levels.
- Turn off the generator and let it cool slightly. Warm oil flows better, but you don’t want it so hot that it burns you.
- Gather all your tools and materials in one place to avoid interruptions mid-task.
Safety First: Always wear gloves to protect your hands from oil and sharp edges. If working indoors, ensure proper ventilation to avoid inhaling fumes.
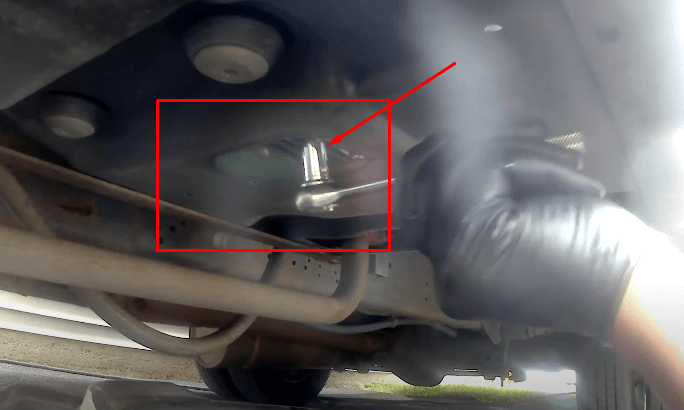
Step 2: Locate the Drain Plug
Every generator has a drain plug that allows you to remove old oil. It’s usually located near the bottom of the generator.
- Use your flashlight to spot it if it’s in a hard-to-see area.
- If your RV generator is enclosed in a compartment, you may need to open an access panel for better visibility.
Once located, place your oil pan or container directly under the drain plug to catch the old oil.
Step 3: Drain the Old Oil
Now comes the messy (but satisfying) part: removing the old oil.
- Use your wrench to loosen and remove the drain plug carefully.
- Allow the oil to flow into the pan. Be patient—it can take a few minutes for it to drain completely.
- Inspect the oil as it drains. If it’s thick, black, or contains debris, your generator definitely needed this oil change!
Once the oil stops dripping, replace the drain plug securely. Avoid overtightening, as this can damage the threads.
Step 4: Remove and Replace the Oil Filter
The oil filter plays a vital role in trapping debris and contaminants that could harm your generator’s engine. Over time, the filter becomes clogged and needs replacement.
- Locate the Oil Filter: Refer to your generator manual to find the filter’s exact location. It’s typically near the drain plug.
- Remove the Old Filter: Use an oil filter wrench if it’s tightly screwed in. Turn it counterclockwise to unscrew. Be prepared for a bit of residual oil to leak out as you remove it.
- Prepare the New Filter: Before installing the new filter, apply a thin layer of fresh oil to the rubber gasket. This helps create a secure seal and prevents leaks.
- Install the New Filter: Screw the new filter in place by hand until it’s snug. Avoid overtightening—hand-tight is usually sufficient.
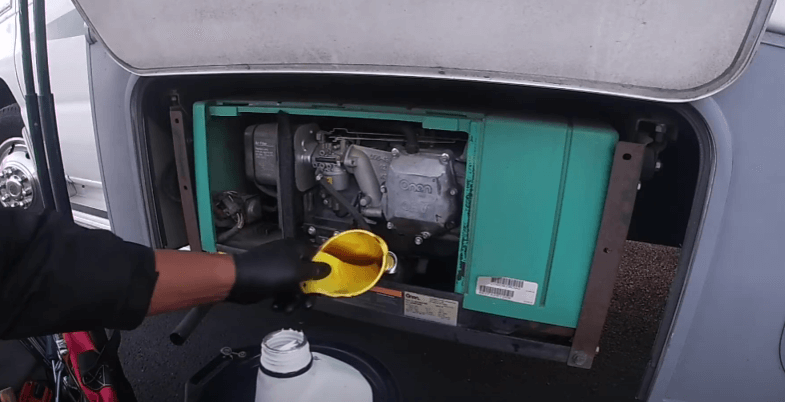
Step 5: Add Fresh Oil
Now it’s time to give your generator some fresh oil and bring it back to life.
- Check the Manual: Double-check the generator manual for the correct oil type and quantity. Common RV generator oils include SAE 10W-30 or 15W-40, but this varies by model.
- Use a Funnel: Place a funnel into the oil fill port to prevent spills.
- Pour in the Oil: Slowly pour the recommended amount of oil into the generator.
- Check the Level: Use the dipstick to ensure the oil level is correct. Add more oil if needed but avoid overfilling.
Pro Tip: After filling, wait a few moments for the oil to settle before taking a final dipstick reading.
Step 6: Clean Up and Dispose of Old Oil
Once the oil change is complete, it’s important to clean up properly:
- Wipe Down Surfaces: Use shop towels or rags to clean up any oil spills on the generator or surrounding areas.
- Dispose of Used Oil: Pour the old oil into a sealed container and take it to a recycling facility or auto parts store that accepts used oil. Never pour oil on the ground or down a drain—it’s harmful to the environment.
- Check for Leaks: Start the generator and let it run for a few minutes. Check for any leaks around the drain plug or oil filter. Tighten if necessary.
Step 7: Record the Maintenance
Keep a maintenance log to track when you last changed the oil and any other work you’ve done on your generator. This is especially useful if you’re planning to sell your RV later, as it shows potential buyers that the vehicle has been well-maintained.
Common Mistakes to Avoid
Changing your generator oil is straightforward, but here are a few mistakes to steer clear of:
- Using the Wrong Oil: Always stick to the manufacturer’s recommendations.
- Overfilling the Oil Tank: Too much oil can cause foaming, leading to engine damage.
- Skipping the Oil Filter: A dirty filter can contaminate fresh oil and reduce engine performance.
- Not Running the Generator Monthly: Running your generator for 30 minutes under load each month prevents oil from stagnating and keeps the engine healthy.
Why Regular Oil Changes Matter
An RV generator is a significant investment, and regular oil changes help protect it. Clean oil reduces engine wear, ensures efficient operation, and prevents breakdowns when you need power the most. Neglecting oil changes can lead to costly repairs, reduced generator lifespan, and frustration on the road.
By making this maintenance task a routine part of your RV care, you’ll enjoy peace of mind knowing your generator is always ready for the next adventure.
Conclusion
Changing your RV generator oil doesn’t require expert skills—just a little time and effort. By following this guide, you’ll not only save money on professional maintenance but also ensure your generator stays in peak condition for years to come.
Have you changed your generator oil before? Share your tips or experiences in the comments below!